JASMINE JOAQUIN

Pod

THE PROJECT
Students were tasked with redesigning a housing for an electronic.
RESEARCH
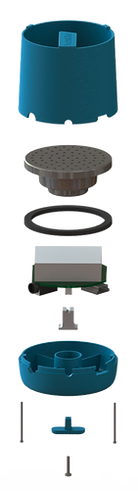
I had a mini speaker that I purchased at Dollarama, so I decided to break it open, see what was inside, and design a housing to fit around the internals. When I opened it, I saw that the main components were the circuit board assembly and the speaker. The speaker was round and needed to sit at the top to be loud enough to be heard, so the top of my speaker design needed to be circular.
IDEATION
I experimented with forms that started as geometric shapes at the base and transformed into a circle at the top, but I decided that it made more sense to keep the design simple and make it cylindrical.

.png)
.png)
.png)
REFINEMENT
I modelled the housing in SolidWorks. Since this product was to be injection moulded, I paid special attention to avoiding undercuts that would make the moulding process more expensive.
The switch to turn the speaker on and off was challenging to design. It needed to be located at the bottom of the speaker and reach inside the speaker to move a switch on the circuit board. I made a pronged design that could grab the switch as the user moved it to the side from outside of the product housing.
.png)
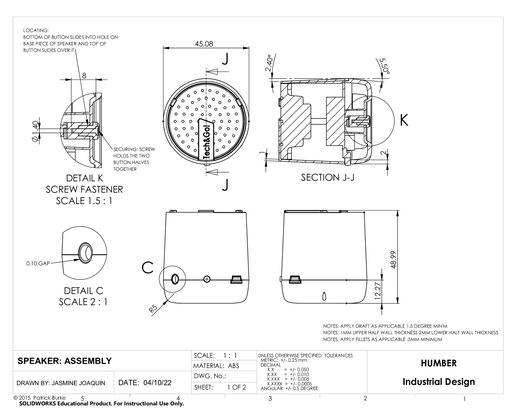
TECHNICAL DRAWINGS
Once the 3D model was finished, I used Solidworks to produce technical drawings of the parts.


.png)
PROTOTYPING
Afterwards, I used my filament 3D printer to quickly print the parts to check that they fit together properly. The print was rough, but it was good enough to prove that the parts I made fit together as intended.
TAKEAWAYS
This was my first project that was focused on creating a manufacturable injection-molded housing design. I learned about different locating and fastening methods used for product housings, manufacturing problems that can make designs more expensive to produce, leaving clearance, and warp and shrinkage of parts.